Photographer’s Guide to Rafting through the Grand Canyon, Part 2 – Marble Canyon

Unless you hike in at Phantom Ranch, your raft trip through the Grand Canyon will start at Lee’s Ferry. At Lee’s Ferry, the Colorado River runs green and cold, as the water is freshly released from Glen Canyon Dam several miles upstream. The color often seems impossibly green, especially when shooting with a polarizing filter. Just south of Lee’s Ferry, the Paria River flows into the Colorado River, typically adding brown silty water to the Colorado; however, not enough to change to green color. Shortly thereafter, the walls of Marble Canyon rise up around the river.


Marble Canyon, though not nearly as deep as the Grand Canyon, is wonderful to photograph. The sedimentary rocks that form the canyon walls, often make spectacular, colorful cliffs which plunge straight down into the river – particularly the Redwall Limestone. The resultant photographic experience is quite different than in the Grand Canyon proper, which cuts through older granitic and metamorphic rocks, leaving the sedimentary formations high up on the sides of the canyon, often not visible from the river.

As you leave Lee’s Ferry and the Paria River behind, Marble Canyon gradually deepens as the river winds south and west, cutting downward through the Paleozoic sedimentary rocks that are found at the top of the Grand Canyon proper. Several miles south of Lee’s Ferry, the canyon is already several hundred feet deep, with sheer vertical cliff walls. Here is the Navajo Bridges (the original highway bridge and the neighboring foot bridge added much later). It’s fun to shoot from the day before your trip begins then again looking up at the bridges on the first day of the trip. The spot is also popular with Californian condors. These huge birds are probably more easily photographed from the bridges than from your raft. You will likely see other condors on occasion throughout the length of Marble Canyon.
A couple miles downstream from the bridges you will encounter the first rapid of the trip at Badger Creek. While not a small rapid, Badger Creek Rapid, along with the other rapids in Marble Canyon, is rather tame compared to the big drops in the Grand Canyon proper. Depending on flow levels and the experience of you boatmen/guides, your trip may not stop to scout any rapids within Marble Canyon, so most of your photography in Marble Canyon will be of scenery rather than whitewater action unless you bring a waterproof camera. That said, my recent trip did stop to scout Mile 24 Rapid because it is unusually difficult at low water levels (and indeed it was, the raft I was on flipped and two of our other boats dump-trucked their passengers and boatmen).
While you may not shoot much white-water action in Marble Canyon, you can create some wonderful shots of rapids should your trip camp next to any (and most campsites both in Marble and Grand Canyons are adjacent to rapids). By camping near rapids, you can shoot the canyon with the rapids in the foreground during the golden hours, using long exposures to make the white water smooth and silky.


Much of the scenery in the Grand Canyon occurs in side canyons to the Colorado. Many trips stop to hike in several of these side canyons. Cathedral Wash, located at river mile 3, upstream of the Navajo Bridges, is quite pretty and can be hiked either up from the river or down from the road into Lee’s Ferry. The next canyon downstream worthy of a photographic stop is North Canyon, at about river mile 20.5. We didn’t stop there on my recent trip, but did so on one of my earlier trips back in the late 1980s.
About 30 river miles are so below Lee’s Ferry is Vasey’s Paradise, a gushing spring shooting from the red rock above the river, with ferns and other green covering the slopes below the spring. This is often mentioned as a good photographic location. However, on my recent visit, the spring was trickling rather than gushing, and much of the vegetation was brown and dead. Consequently, it was not very photogenic. I suspect the decades long drought on the Colorado Plateau has contributed to the decrease in spring flow such that now is it a shadow of its former self. If you do stop here, beware of poison ivy.

But drought cannot harm another highlight of Marble Canyon: Redwall Cavern. Not really a cave, Redwall Cavern is an huge, deep alcove at river level carved out of the Redwall Limestone. In his exploration of the canyon, Major John Wesley Powell described Redwall Cavern as being able to sit 50,000 people. That might be an exaggeration, but it could easily fit several thousand. The floor of the cavern is deep, soft sand. Reflected light off the canyon wall lights the inside of the alcove with a warm red glow. To get the entire mouth of the cavern in a single shot requires an ultra-wide-angle lens. Alternatively, you can stitch several images together to form a panorama covering the entire cavern. To have detail both inside and outside the cavern, consider using HDR. Also consider shooting silhouette shots of people to give a sense of scale. Good shots can be made most anytime of day, but are probably best in the morning when the sun lights up the opposing canyon wall.


Past Redwall Cavern, there is a natural bridge, the Bridge of Sighs, on river right at about river mile 36. It’s not most photogenic arch you’ll ever see, but if you want to catch a shot of it, be prepared as it is only visible along a short section of river and you’ll likely be shooting from the boat rather than stopping.

Near river mile 41.5, you will pass the very scenic Royal Arches. These large alcoves are easily photographed from your raft as you float by. At mile 43.3, you can see the remains of Anasazi Bridge, a wooden structure build by the Ancestral Puebloan people to connect two cliff ledges, high above the river on the right. It is quite distance from the river, and without a long telephoto lens, difficult to shoot. At river mile 47, you will pass the Triple Alcoves, and like the Royal Arches, good shots can be made from your raft.


Shortly past the Triple Alcoves is Saddle Canyon. This side canyon is definitely worth exploring with your camera. A short hike (about 1.4 miles one-way) up the canyon leads to a slot canyon and scenic waterfall. (Unfortunately, we did not stop on my recent trip. I did hike up this canyon on one of my earlier trips through the Grand Canyon, however).
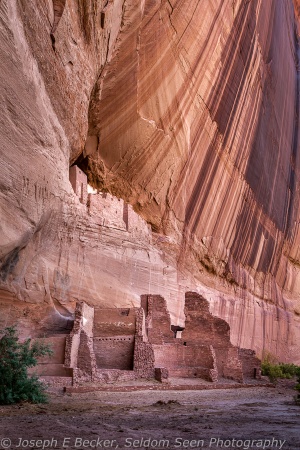
At river mile 53, you reach one of the highlights and most icon shots of the entire Grand Canyon, the Nankoweap Granaries. Almost every raft trip stops here and takes the short, but steep (about 0.6 miles and 600-foot elevation gain), hike up to the granaries. With the granaries in the foreground right and the canyon in the background left, it is truly a world-class spot. A moderately wide-angle lens works well, or you can stitch together a panorama, possibly using HDR to help with the contrast. Touching or otherwise disturbing ancient structures in Grand Canyon National Park is prohibited, so please be careful not to touch or lean against the granary walls. It would be a shame if the Park Service decided to fence off this area sometime in the future due to visitors interfering with the structures. Besides shooting compositions with the granaries, try shooting the canyon by itself, the view of which, even partway up the trail, is amazing.


There are no major sights through the rest of Marble Canyon until the Marble Canyon ends and the Grand Canyon begins at the Little Colorado River at river mile 61.5. The Little Colorado River is a major tributary of the Colorado River that flows year round due to the discharge of Blue Spring at about 200 cubic feet per second. Blue Spring, which is located about 15 miles upstream on the Little Colorado from its the confluence with the Colorado River, is aptly named. The water emanating from the spring is a wonderful turquoise blue color and the color carries downstream all the way to the confluence. However, the blue waters can occasionally be overwhelmed by brown dirty water during extended rainy periods or flash flood events further upstream in the Little Colorado basin (the Little Colorado is typically dry upstream from Blue Spring). This more typically occurs in the “monsoon” season of late summer.

The high mineral content in the waters of the Little Colorado River also lead to incredibly white sand deposits along the river banks in the area near the confluence. The white sands, blue waters, red canyon walls, and dark green water of the Colorado River make the lower reach of the Little Colorado River an amazing spot to do photography.

Most commercial river trips stop at the Little Colorado River for several hours, and some private trips stop for longer periods which allow hiking up the canyon. The confluence of the Little Colorado River and the Colorado River is a sacred place for several Native peoples. It is also one of the last places the endangered humpback chub lives (a type of fish). Please respect the land and water in this area.
As mentioned, below the Little Colorado River, the Grand Canyon begins (though you’d be hard pressed to see any distinct change in the canyon walls). In my next post in the series, I’ll cover the next 75 miles of river and canyon, from the Little Colorado River to Deer Creek.
North Rim

Sunrise at Point Imperial
During our recent trip, Tanya and I originally planned to visit the North Rim of the Grand Canyon for three days. I reserved a spot at the North Rim Campground in Grand Canyon National Park back in May. However, life got in the way (at least in a good way), and Tanya was awarded a full-time teaching job 2 days before we left on the trip, and therefore, needed to be back in Tacoma sooner than our original plan. So I cancelled 2 nights of our campground reservation. As it turned out, we did get three days at the North Rim. Torrential rains hit the Utah-Arizona border area when we were staying in Page, Arizona. After Page, we were planning to camp in the Paria area for two nights before going to the North Rim. While we were able to drive to the campground near Paria, all the trails we wanted to hike in the area were inaccessible due to impassable dirt roads. So instead, we went to the North Rim two nights early.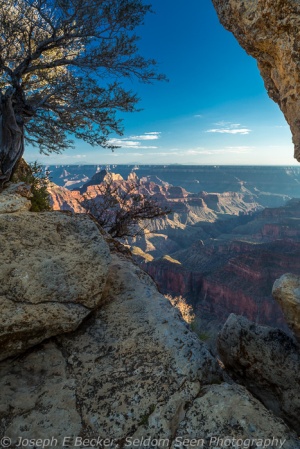
Now, you may be asking, if Joe had to reserve a camping spot 5 months ahead of time, how could he just show up and expect to set up his tent? Good question. The answer is I didn’t expect it. We called the national park, but were unable to get through the voice mail system to find out if any spots were available. Instead we headed to the national forest, where “dispersed” camping is allowed without reservations – just find a spot and set up your tent (but don’t expect any amenities and bring your own water, toilet paper, and “cat-hole” digging device). Though we have done primitive car camping before, we weren’t prepared for it this time, having left our portable table and shovel at home. So we stopped in Kanab, Utah at the local Ace Hardware and bought a table and shovel ( a nice folding table actually, better than the one we have at home). Somehow we fit this new gear in the already overstuffed car and drove to the Forest Service ranger station in Fredonia, Arizona. There we asked directions to Crazy Jug Point.
When most people think of the Grand Canyon, they think of Grand Canyon National Park. But actually, a large part of the canyon’s north rim is outside the park and inside Kaibab National Forest. National forests are much less restrictive than national parks, including allowing camping almost anywhere. Crazy Jug Point is a great place to camp. It took about 2 1/4 hours to drive the roughly 50 miles from Fredonia to Crazy Jug (mostly on well maintained dirt roads). We arrived in mid-afternoon and found three other groups already camping there. However, we found a very sweet, nicely shaded spot, just 20 feet off the rim, out of sight of the other groups. The view was not quite on par with the view from the Grand Canyon Lodge at the North Rim in the park, but the lack of a crowd (and the price – free) make up for it. We stayed two nights. After our first night, the other groups left, and Tanya and I had the entire place to ourselves. Imagine, sitting on the edge of the Grand Canyon, sipping a cold beer (okay, wine for Tanya), watching the sunset without anyone else within miles. That was our experience at Crazy Jug on the second night.
For our 3rd night at the North Rim, we drove to the North Rim Campground in the park, a distance of 36 miles and about 1 3/4 hours. The campground there had all the amenities you’d expect for national park, with the added bonus of showers (which in my experience are not common in national parks). It is a good campground, and with a short walk (1/4 mile or so), you can see the canyon. But it is not a place for solitude. The campground was full (90 sites).
 Photography wise, camping in the park offered more options and better views. There are ten north-rim viewpoints in the main portion of the park. Four of these are accessible by paved road or short trails, the others by day hikes. With only one night in the park, we drove to the four easily accessible viewpoints, only stopping at three, and I made plans to on where to go back to for sunset that night and sunrise the following morning.
That evening, I stayed close to the campground and went to Bright Angel Point, which is directly behind the North Rim Lodge. This is the most popular viewpoint on the North Rim. A 0.4-mile, paved trail leads from the lodge and visitor center out to the viewpoint proper. However, there are many great views along the way; the trail being along the top of a narrow promontory. Being close to the lodge and campground, I was joined by perhaps a 20 other people. Right at sunset, I was out at the end of the trail. With limited flat areas at the viewpoint, it was a bit difficult to find a spot to place the tripod and find a pleasing composition without getting people in the frame. However, I did get a good spot by stepping down a couple of feet off the trail and standing on a flat rock. I would caution those of you with vertigo; you might not want to do the same. The rock I was on was about 5 or 6 feet across, with drop offs on three sides of 50 to 100 feet. The sunset was not anything to write home about, and the crowd dispersed quickly after the sun went down. I stayed for another 45 minutes, bringing home some nice shots from the blue hour.
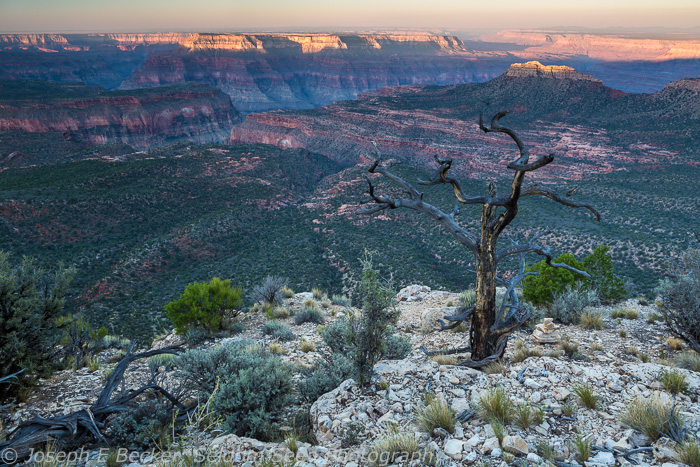
The following morning, I got up an hour and a half before sunrise and drove to Point Imperial, roughly an hour’s drive from the campground. Here on the last morning of our trip, before we made the quick two-day drive home (later that day, we drove from the North Rim to Mountain Home, Idaho, about 680 miles), I stood alone, just me, my tripod, and one of the best views on planet. It was cold (about 37 degrees F), it was early (about 5:45 am when I got there; sunrise was at 6:09 am), and I was rewarded by the best sunrise or sunset of the entire trip. I shot like a madman for an hour or so, still the only person at the viewpoint, and headed back to pack up camp. While the view is fantastic at Point Imperial, it is more limited, with many fewer vantage points, than Bright Angel Point or Cape Royal. The perfect place for some quick shots before hitting the road.
After years of wanting to see the North Rim and not making it, I found the North Rim did not disappoint. This area is a landscape photographers paradise. I would have liked more time there, but it wasn’t to be. Now, having seen it, I have a big reason to go back. If you want to see the canyon without the huge crowds common on the South Rim, head north. It is well worth it.

Sunset at Crazy Jug Point
Sunrise at Crazy Jug Point, taken from a spot just a 2-minute walk from my tent

I loved the look of this tree near the start of the trail along Bright Angel Point

Sunset, taken from the Bright Angel Viewpoint

Grand Canyon walls below Bright Angel Point, taken during the blue hour

View from Bright Angel Viewpoint, taken after sunset during the blue hour

Sunrise with Mount Hayden, Point Imperial

Glowing canyon walls at Point Imperial

Another shot of Mount Hayden from Point Imperial
Hubbell Trading Post

 If you find yourself in northeastern Arizona and are traveling near Ganado, consider stopping by the Hubbell Trading Post, the oldest continuing operated trading post in the Navajo Nation. This place oozes history of the American West. John Lorenzo Hubbell purchased the trading post in 1878 shortly after the Navajo people were allowed back onto their land after their forced exile to Bosque Redondo. Hubbell prospered, and he built a trading empire throughout the Navajo Nation including several trading posts and a stage line. The trading post at Ganado was operated by the Hubbell family until 1957 when they sold it to the Park Service. While the site is a National Historic Site, it is still operated as an authentic trading post where you can buy a can of Coke or a jar of pickles; brooms or horse tack; a Navajo blanket, basket, or turquoise jewelry; or many other items. It’s part store and part museum. The Park Service also runs a small visitor center detailing the history of the post.
Outside the main trading post, visitors are free to roam the grounds, viewing historic farm machinery, the bunkhouse and guest hogan, or visiting with the horses and Navajo Churro sheep. The Park Service leads tours of the property five times daily ($2 per person), or you can pick up a self-guided tour booklet. There are separate tours of the interior of the Hubbell family residence.


Canyon de Chelly

Navajo Fortress (on left) at the junction of Canyon del Muerto (foreground)and Black Rock Canyon (a side canyon, in the middle).
Canyon de Chelly National Monument is a bit off the beaten track and missed by many visiting the Southwest. In fact, in my many travels to the Southwest, our trip last month was the first time I had been there. It certainly deserves more visitors than it gets; it is a wonderful place which combines scenery, ancient history, and traditional Navajo culture. First, the canyons are beautiful, and deserving of national monument status without their historical and cultural aspects. But what really makes it special are the many large and small ancestral Indian ruins sprinkled throughout the canyons and the Navajos who to this day make it their home. These canyons have been continually inhabited for nearly 5,000 years.
White House Ruin
The park is made up of two main canyons that join together near the park entrance. These are Canyon del Muerto and Canyon de Chelly itself. There are many other smaller canyons that branch off these main two. The canyons start as a shallow wash and gradually deepen; eventually the walls reach a height of 1,000 feet. The stunning vertical red, yellow and orange sandstone walls contrast with the green cottonwoods and small agricultural fields, tended by resident Navajos, in the flat, canyon bottom.
There are two ways to see the canyons, above from the canyon rims or from below, inside the canyons themselves. The South Rim Road travels 36 miles along the southern side of Canyon de Chelly. There are seven viewpoints along the road, the best (in my opinion) are the White House Overlook and Spider Rock Overlook, but all are worth a stop. The North Rim Road traverses 32 miles along the northwest rim of Canyon del Muerto to three overlooks – all are worth stopping at.
While the views from the rim are good, to really experience the canyons you need to see it from within. To travel inside the canyons, you either need to go with a Navajo guide or hike in yourself on the only trail open without a guide – the White House Trail. This trail takes you from the rim at the White House Viewpoint, down the wall, and into the Canyon de Chelly just up canyon of the White House Ruin – so named because of one of the buildings is painted white. The ruin has two levels, one on the floor of the canyon and one some 30 feet higher on the canyon wall. The hike is well worth doing, but can be brutal in the hot sun of the afternoon. Most of the trail is in the sun throughout the day, expect perhaps late afternoon. You might try going first thing in the morning (which is what Tanya and I did). The ruin will be in the shade in the morning and in full sun in later in the afternoon. Be warned if you take a tripod. The ruin is surrounded by a 5-foot high wire fence. My tripod was too short to extend over the top of the fence, and I ended up shooting images of the ruin by setting the camera on the top of the fence and “hanging” the tripod down like a plumb bob to help steady the camera. This way I was able to get sharp photos with shutter speeds as low as 1/15 seconds. Such fences are also around other ruins in the canyons.
The other way to get into the canyons is to hire a guide. We took a “half day” tour from Changing Woman Tours. In this case, a half day was about three hours, which is barely enough time to start to see the canyons. Be sure to inquire about the length of your tour. Some half day tours are four hours. Full day tours can be six or more hours. In hindsight, I should have picked a longer length trip. There is just too much to see in only a few hours. Our tour guide, Victoria Begay, was quite knowledgeable, and we learned much about the history of the area. Because we had earlier hiked to White House Ruin, Victoria took us up Canyon del Muerto. It is my understanding, however, that most tours go up Canyon de Chelly. If you prefer to go one way or the other, be sure to ask your guide. Most people, us included, opt for a vehicle tour – typically in a 4-wheel drive supplied by the tour company. Hiking and horseback tours are also available. Tour costs vary. Our tour, for just the two of us and the guide, cost $165.

Spider Rock

Canyon de Chelly from Sliding House Overlook

Antelope and sheep pictoglyphs at the Antelope House Ruin; these drawing are nearly life-size

Antelope House Ruin in Canyon del Muerto

Another view of the White House Ruin; the “white house” is clearly visible on the upper level

Junction Ruin, so named due to its location at the confluence of Canyon del Muerto and Canyon de Chelly

Snake, hands, frog, and Kokopelli petroglyphs

Canyon de Chelly near White House, a Navajo hogan is in the middle right in the shade of a cottonwood.
Monument Valley
 Throughout my many trips to the American Southwest, somehow I’ve always missed Monument Valley. So on our trip earlier this month, Tanya and I made sure to see it, and I’m sure glad we did. The scenery and photography were superb. Monument Valley, by virtue of its role in many movies, as well as countless published still photographs, screams American West, making it one of the top attractions in the Southwest. This is one reason I’ve avoided it in the past. I prefer my scenery without huge crowds. And withthe popularity of Monument Valley, it was sureto be crowded. As it turned out, it wasn’t too bad – though it certainly wasn’t deserted, Tanya and I were able to visit many of the viewpoints on the Scenic Drive without anyone else present.

Flowers near the southern end of Rain God Mesa
The view from the hotel/visitor center, as well as the nearby campground is amazing. It sits above the valley with a view of the iconic West Mitten, East Mitten, and Merrick Buttes so close it feels like you can reach out and touch them. Just a quick trip to see this view and nothing more is worth the $20 entry fee (per car) into the Monument Valley Navajo Tribal Park. But to get the most out of the park, the Scenic Drive is definitely worth taking.
There are many tours available into valley, including many photo tours. And I heard tours being sold because the Scenic Drive road is unsuitable for passenger cars. This is not true. The road, though unpaved, it completely drivable (when not wet) by two-wheel drive cars except perhaps cars with very low clearance. And it isn’t necessary to take a tour to come back with good photos (we did not take any tours). However, the general public is limited to the Scenic Drive route; even short walks off the viewpoints or road are not allowed. Therefore, you may consider a tour, as many tours go to areas not open to the public. Additionally, the Scenic Drive is only open to the public during limited hours. Photo tours allow access to the valley at many times of the year when the Scenic Drive is closed during sunrise and sunset.
The published hours for the Scenic Drive are 6 AM to 8:30 PM in May through September and 8 AM to 5 PM the rest of the year. However, it seems that the Park’s definition of September is different from mine. On the day we left Monument Valley, September 4th, I wanted to do a quick drive to several of the viewpoint on the Scenic Drive, driving to the gate at about 6:30. It was not open, and did not open until 8 AM. Needless to say, I was not very happy about that. Luckily, during the evenings we were there, it was open until 8:30 PM, and I was able to be out on the Scenic Drive at sunset.
Though the scenery is fantastic, Monument Valley is not without its annoyances. The “loose” interpretation of the opening hour for the Scenic Drive being just one. We camped for two nights at Monument Valley. For the photography, this was great. The campground there is called The View Campground, and with good reason – the view is amazing. Step outside your tent at sunrise and set up the tripod! However, for a camping experience, I suggest picking someplace else. The sitesare called “wilderness” sites, but there is nothing wilderness about them. These “wilderness” sitesare crowded together on a sandy slope overlooking the valley. The sites are small, semi-flat spots suitable mostly for small tents only. There are no picnic tables, fire pits, or even a water spigot (water is only available from the bathroom sinks). We saw many people cooking in the parking lot and not at their campsites. I think the campgroundis set up to “encourage” people to eat in the restaurant (which we did for one lunch). But then, the restaurant closes to non-hotel guests at 7 PM, so if you wanted to be out photographing at sunset then have a nice meal, forget it. The campground restroom was nice with electricity and running water, and even has showers. However, even thoughfairly new (it just opened this year), it was not built with commercial grade fixtures and some of the hardware was already falling off.

View through the Window
Another annoyance, at least to me, were the many roadside sales booths, some looking like rundown shacks, at many of the viewpoints along the Scenic Drive. It seemed like no matter which way you turned, there was someone trying to sell you something – be it a tour, a piece of cheap jewelry, or having your picture taken on a horse. And if you do want to buy some the jewelry (like Tanya did), be sure to have cash and exact change. While the commercialization of such a natural wonder is sad, I can’t really blame the Navajo people, many of who live in the valley in near poverty.
Commercial photography is prohibited in Monument Valley (and all Navajo Parks) without a permit. I did obtain a permit, but it was not easy. I will write a post on Navajo photo permits in a later post.

John Ford’s Point

Horseback riders near Bird Spring

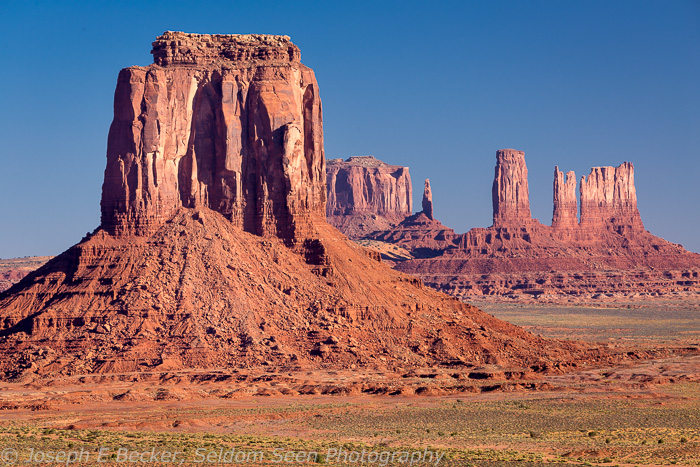
West Mitten and Sentinel Butte
View from Artist Point
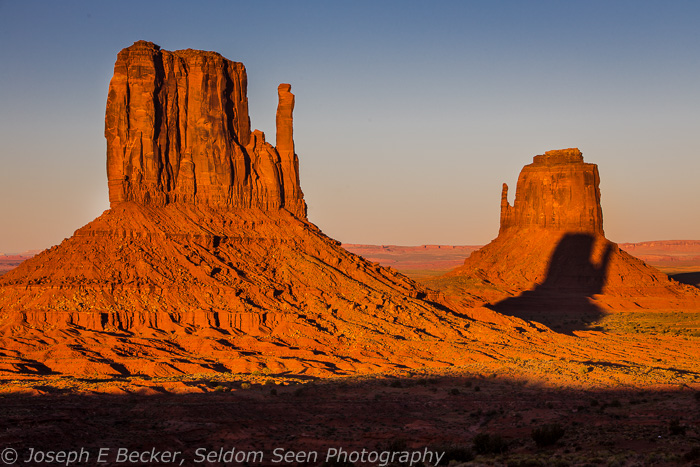
Sunset at the Mittens
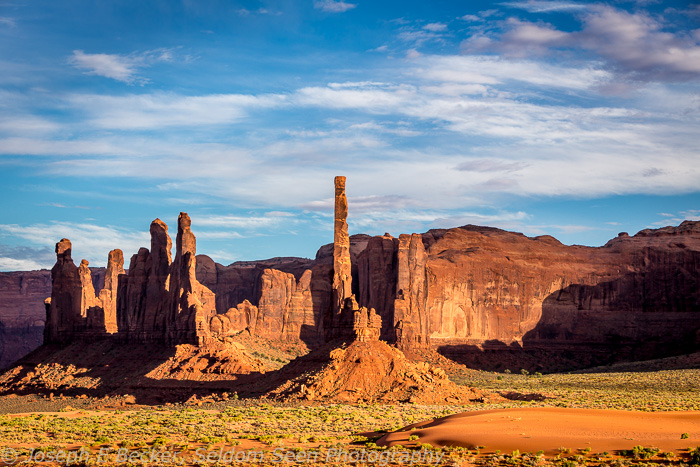
Totem Pole and Yei Bi Chei

Artist Point View in Black and White

View from the North Window Overlook

West Mitten, East Mitten and Merrick Buttes during the blue hour after sunset


