Darkroomless

An oldie but a goodie, Devils Garden in the Grand Staircase Escalante National Monument, Utah; shot on film and processed in my wet darkroom.
My computer is down now, going through an upgrade. So for the next week or so, I am without a darkroom. I’m wondering how many of you remember the days when a darkroom was actually a dark room and not a computer? Or perhaps you are one of the few, the lonely, who still use a wet darkroom. I imagine there are very many, probably even the majority, photographers who have never even seen a real darkroom, let alone processed film or prints in one.
I do have nostalgia for my wet darkroom days. Back then, I shot with black and white film, usually Kodak TMax, and color slide film (Velvia or various versions of Kodak Extachrome). I don’t really miss shooting with film – I like being able to bracket and experiment with digital without having to worry about the cost of film and processing (though I’ve probably replaced those costs with camera and computer upgrade costs); I like being able to see instantly if a shot works on the back of the camera. But I do sometimes miss working in the darkroom, watching a print magically change from a blank sheet of paper to a photograph, or pulling a roll of film out of its developing can and seeing the negatives for the first time.
Processing film and producing prints in a wet darkroom was a much more sensory experience than working on a computer. And working in the dark, either in complete darkness or in the glow of a dim red safelight, enhanced.the sensory experience. With limited sight, the smells, feels, and sounds of the darkroom came alive. There was the unique smell of the developer or the vinegary smell of stop bath; the smooth feel of the paper and film, both wet and dry; the sound of the enlarger humming, the timer ticking, or the water running. And though the light was dim, there was plenty to see – the negative image (or color slide) projected by the enlarger, the neon green glow of the moving hands on the timer, and, as mentioned above, images slowly appearing from nothingness in the developer tray.
There was so much more activity too. Today, with computers, processing an image physically involves using a keyboard and mouse. But in the wet darkroom days, you loaded film into a development canister (in complete darkness) by breaking open the film canister, cutting the tapered end of the film off with scissors, threading the film onto a development reel (trying hard to make sure it’s threaded properly so each wrap of film doesn’t touch its neighbors – and never knowing for sure if you did it right or not until the development was complete!), placing the reel into the development tank, and piecing the tank back together (hopefully correctly) so that it was light tight. There was the pouring of chemicals in and out of the development tank, rolling the tank back and forth on a table top to slosh the film and agitate the chemicals. There was the washing of the film, and pulling it out of the tank for your first look to see if it was developed properly and if you messed up on your exposure settings. And finally, hanging the film to dry, using a hook on top and a small weight on the bottom to keep it from curling.
Similarly, printing was much more of an activity than sticking a piece of paper in a printer and pressing a button on a computer. There was loading the film or slide into a negative holder and placing that in the enlarger, moving the enlarger head up and down to get the right size for the print, focusing the enlarger (peering through a special little scope gadget to make sure the film grain was in focus), adjusting the print easel, calculating exposure times, setting the f-stop on the enlarger and setting the timer, practicing the printing prior to putting paper in the easel, placing the paper on the easel, turning on the enlarger, conducting dodging and burning with wands or holes cut out of cardboard, and slipping the paper into its chemical baths.
Before the days of digital, it was impossible to create totally identical prints when printing from the same negative. Small differences in timing of dodging and burning, timing in the developer bath, the age of the chemicals, etc. all conspired to make each print unique.
Those days are gone for me now. All that equipment was sold for pennies on the dollar or given or thrown away. Today, I process and print many more images in much less time, without dumping gallons of toxic chemicals down the drain. That’s progress I guess. But on these days when my computer is down, thinking back on those hours in the darkness does bring back some fond memories.
Moon Madness
 I must be obsessed with the moon lately writing two posts in a row about the moon. Yesterday I joined others from the Tacoma Mountaineers photo group in shooting the full moon from Gig Harbor. Actually, yesterday was the day before the full moon, or what some call the Photographers Moon, since it looks full and rises before the sun sets. As viewed from Gig Harbor yesterday, the moon rose north of Mount Rainier, and by sunset was near the mountain. Unfortunately, the clouds did not cooperate, and the late afternoon sunshine was blocked by high clouds in the west. The beautiful sunset light on the harbor and mountain did not materialize. The golden hour turned pale.
The featured image above was taken shortly before sunset. Not a bad image overall, but a pale imitation of what it could have been. Imagine what it would have looked like if clouds in the west had not been blocking the sun. Imagine Rainier lit with a warm glow and the clouds burning with pink. Yesterday, it was not to be.
I’ve been thinking of this shot for several years, and last night just didn’t cut it for me. In looking ahead, the Photographers Moon next month (on June 11) and in July (also on the 11th) will rise closer to the mountain than yesterday. I think I will go back and try again. Anyone want to join me in my moon madness?


Moon Troubles
 I have trouble photographing the moon. Okay, it’s not so hard before for the sun sets (which is why the best full moon pictures are typically taken the day before the full moon and, consequently, before the sun sets), but after dark, I have lots of problems. There is just too much contrast. The moon is bright, basically as bright as anything lit by sunlight on a cloudless sunny mid-day. Everything else is dark. The dynamic range of any scene with the moon is too much for a camera to handle.
Perfect time to try some HDR photography, right? Maybe, but I’ve never gotten it to work well. I’ve always get funny looking light artifacts around the moon; all my attempts at using HDR for scenes with the moon have looked awful. How about shooting one exposure for the moon, one for the rest of the scene, and combining them in Photoshop. Again, maybe you can do that, but every time I’ve tried it, it doesn’t work – there’s too much glare around the moon and I can’t get the sky to look right.
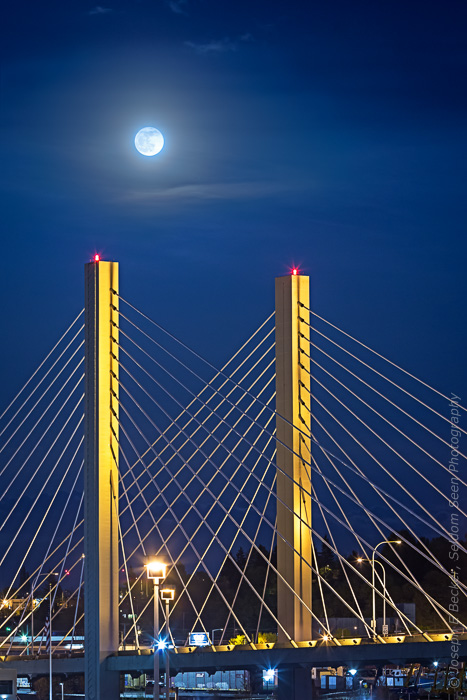
Last month when I wanted to photograph the full moon rising behind the Glass Museum in Tacoma, I was disappointed when there were clouds on the eastern horizon and the moon wasn’t visible. Less than an hour later, the moon rose above the clouds, and though it was no longer aligned with the Glass Museum, it lined up nicely with the cable bridge over the Thea Foss Waterway. Nice shot, I thought, except now it was way too dark to capture both the moon and the with a single exposure. I set up the tripod anyway and took a series of shots, hoping that perhaps the contrast would not be too extreme.
Later, when I downloaded the shots, I was disappointed to find out contrast was too great – moon troubles were visiting me again. I tried HDR (once again) and was disappointed with the results (once again). I was frustrated. At that point, I figured someone else must have an answer to this problem, so I spent some time researching moon photography on Google. Most advice centered around photographing during twilight before it was too dark. Not helpful in my case. After a bit of searching, I found a YouTube video (which I can’t find again to credit here), where the photographer used HDR for only the moon and the area of sky immediately around it, a single image for the rest of the shot, then combined the two images in Photoshop. He then re-imported the resultant image into Photomatix for additional tone mapping, which I thought wasn’t necessary. But the first part sounded interesting.
I had a series of seven images, shot one f-stop apart. I imported all into Photomatix and worked it for the moon only. I re-imported the HDR moon image into Lightroom. Then I took a single image from the original seven and worked it in Lightroom for the foreground only. I also worked the HDR moon image in Lightroom to approximately match the sky to the sky (away from the moon) in the foreground image. I exported both images to Photoshop into a single document, with the foreground image as the background layer and the HDR moon image laying on top. I used a layer mask on the HDR moon layer to mask out everything but the area around the moon, feathering the mask match the sky in the underlying layer. The two skies didnt quite match, so I used a curves layer with a clipping mask on the HDR moon layer to get the tone of the two skies to be more similar. Once I was satisfied with the result, I continued with my normal Photoshop workflow to finish the image.
Perfect? No. But in the end, after a lot of work, the result is the best moon image I’ve ever captured after dark. What do you think, is it any good? And please, if anyone has some better way to handle my moon troubles, be kind and let me know.


