Cirque of Towers Part 2: In and Out of the Cirque

 The Cirque of Towers in the Wind River Range of Wyoming is truly an amazing place. The photos that accompany this post really do not do it justice. It clearly rivals the scenery in many a National Park or Monument, and while there, I heard more than one person question why it isn’t in one. My guess is that it may have more to do with local and western politics than anything else (for example, there was a large, vocal opposition to Grand Teton National Park), but that is just speculation. Or it may be that Wyoming is the only state in which the President cannot use the Antiquities Act to create a national monument. Whatever the reason, the Cirque is worthy. That said, it may be just as well it isn’t in National Park – if that were the case, it would be mobbed. While Lonesome Lake, located in the middle of the Cirque, isn’t really lonesome, it isn’t crowded either.
In my previous post, I described the first half of a backpacking trip my brother, Rob, and I made to Cirque of Towers , where we camped at Shadow Lake behind (west of) the Cirque. The official trail ends at Shadow Lake, but an unmaintained trail climbs up above Shadow Lake, skirts several other lakes, and climbs Texas Pass into the Cirque.

Billy’s Lake, on the trail to Texas Pass
The unmaintained trail is a bit hard to follow at some points. As Rob and I hiked up the hill east of Shadow Lake, we wandered off the trail once or twice, but the forest is not thick here and it was easy to keep going. At the top of the hill, the land flattens out in a mostly treeless mountain valley. Here the trail is again easy to follow, skirting along or above the shores Billy’s Lake, Barren Lake, and Texas Lake. As we were told earlier, there are great spots to camp near Billy’s Lake, though we both thought the view was better at Shadow Lake (this is not to say the view is bad at Billy’s Lake, it is great, just not as great as at Shadow). The upper two lakes, Barren and Texas, looked to have fewer spots to pitch a tent. Interestingly, Barren Lake did not apparently get its name from lack of fish. As the trail climbed some 50 feet above the shore, we could still see large trout in the cruising along the shoreline.
The valley ends abruptly in a rocky wall of mountains with one steep looking pass. So far, the elevation gain isn’t bad. Shadow Lake is at 10,287 feet, and the trail before climbing Texas Pass is about 10,800 feet (and most of that elevation gain came between Shadow and Billy’s Lakes) covering about 1.75 miles. But from near the shore of Texas Lake up to the top of Texas Pass, at an elevation of about 11,450, is a grueling climb of nearly 700 feet in about just 1/4 of a mile. (For those of you familiar with the Enchantments in Washington State, it reminded me a lot of Aasgard Pass above Colchuck Lake – though not as long – Aasgard gaining 2,000 feet of elevation in about 3/4 of a mile.) During the climb I found myself taking plenty of camera breaks to shoot the lakes below (seriously, just because the scenery is so good).

Rob stands below Texas Pass
Though the trail is not maintained, there still is an official Forest Service, weather-worn sign at the top of the pass marking the boundary on the continental divide between the Teton Wilderness in Bridger-Teton National Forest from the Popo Agie Wilderness in the Shoshone National Forest. The view from the pass into the Cirque is dominated by Pingora Peak, a graceful granite tower on the east side of the continental divide named, according to Backpacker.com, for the Shoshone word for “high, rocky, inaccessible peak.”
The trail south of Texas Pass leads down past the base of Pingora Peak to Lonesome Lake (on the featured image at the top, Pingora Peak is the prominent one on the left). Though mostly meadows, the trail is once again easy to lose. Just keep heading downhill, an elevation drop of about 1,300 feet in one mile. The trail is east of the small creek that comes out of the small cirque below the pass, cutting through the trees above Lonesome Lake, emerging at the northwest corner of the lake. From there, it skirts the shoreline and meets up with an official trail again right at the outlet stream at the east end of the lake. (Or I should say river, the lake is the headwaters for the North Popo Agie River.)
There is no camping within a quarter-mile of the lake. We found abundant campsites on the southeast side of the lake. The view of the Cirque of Towers, as it surrounds the lake, is spectacular. Unfortunately, the afternoon we arrived, the sky had grown overcast, and it looked like it might rain that night. I took a few photos, but just mainly enjoyed the view and took a nap on a flat boulder “island” along the lake shore.

View from Texas Pass down to Barren and Texas Lakes
In the morning, we rose early for sunrise, just in case the clouds had parted in the night. And they had. As the first alpenglow hit the peaks, the lake was a mirror. As the sun rose, lighting more of the mountains, a slight breeze came up, but the view was no less amazing.
Later that morning, we packed up and climbed the trail to Jackass Pass – not nearly as bad as Texas Pass, only gaining 550 feet over a mile – the scenery spectacular all the way. We spent a long time at the pass, climbing the small hill west of it, soaking in the view of the nearby War Bonnet Peak to the west, the rest of the Cirque and Lonesome Lake to the north, and Arrowhead Lake (shaped exactly like an arrowhead) to the southwest.
From Jackass Pass, the trail traverses along the mountainside above Arrowhead Lake then drops about 1,000 feet down to Big Sandy Lake, about 2.4 miles from the top of Jackass. While the elevation between Big Sandy Lake and Jackass Pass isn’t too extreme, both Rob and I were glad we were coming down instead of going up. What’s not included in the 1,000 elevation gain is all the little ups and downs. We both thought coming into the Cirque from the north via Texas Pass was the easier option if doing the loop trip (if doing an in-and-out, coming in via Big Sandy and Jackass Pass is probably easier, but you would miss Shadow Lake that way).
Our original plan was to camp at Big Sandy Lake and hike out the next day. Even though the scenery at Big Sandy Lake is great, after the previous day in the Cirque, it didn’t quite match up, and still being relatively early in the day, we decided to hump it all the way out that afternoon and spend our extra day driving through Yellowstone National Park on the way home. The trail from Big Sandy out to the trailhead is about 5.6 miles and relatively flat, losing only about 600 feet. We set a good pace and made it back to the car before dinner time.
All in all, it was a great backpacking trip. I highly recommend doing the loop. Don’t be afraid of the portion of the trail that is unmaintained and unofficial. For the most part, it is easy to follow, and where it is not, the way to go is fairly obvious. This national-park worthy hike will leave you wanting go back – I can’t wait to go back.

Looking toward the south end of the Cirque of Towers from Texas Pass

Lonesome Lake, Pigora Peak, and the Cirque of Towers

War Bonnet Peak and Warrior Peak above Lonesome Lake

Morning shadows fall across the Cirque and Lonesome Lake

Part of the Cirque from the trail up to Jackass Pass, from right to left: Overhanging Tower, Shark’s Nose, Block Tower, Watchtowers, an unnamed peak (or at least one I couldn’t find the name of), and Pylon Peak

It was not all mountain scenery, wildflowers were plentiful

View of the north portion of the Cirque and Lonesome Lake from Jackass Pass; Texas Pass is at the snowfield in the notch directly above Lonesome Lake

View south of Jackass Pass featuring Arrowhead Lake

View of unnamed lake and Schiestler Peak on the trail between Jackass Pass and Big Sandy Lake

Big Sandy Lake and Big Sandy Mountain
Cirque of Towers Part 1: Shadow Lake

 Following the eclipse, my brother and I set off backpacking in the Wind River Range of Wyoming. We did the Cirque of Towers look hike, about 25 miles through some of the most beautiful mountain scenery in the United States. I’ve wanted to go there for several years now after seeing some photographs taken by my buddy, Don Thompson, on a trip he made. After the wildfires in British Columbia canceled our hike in Kootney National Park, we needed to find an alternate destination that didn’t require a lengthy or complicated permit process. The Wind River Range was the answer. No permits needed, other than signing in at the trailhead. In preparation for the trip, I found this blog post, which provides a nice guide to the hike.

Divide Lake
After the eclipse, we made a sort-of-quick stop in Pinedale to borrow bear canisters from the Forest Service ranger station. BTW, apparently they accept reservations for the bear canisters, which we did not have. Luckily, several had just come in and they cleaned them out and let us have them. We started our trip on a Monday, if you plan on starting closer to a weekend, you may want to reserve (or bring your own). Bear canisters are highly recommended. Reportedly, the rangers will give out tickets to anyone who does not practice bear-safe food handling. Further, according to a sign at the trailhead, the bears in the area have learned to cut ropes to get hanging bags of food down. Play it safe, take a bear-proof container.
While picking up the bear canisters was quick, getting a “quick bite” before running off into the wilderness was not. We went to the Wind River Brewing pub and the place was packed, even though it was well past lunch time (about 3 pm). We found the last two seats available at the bar and waited. It took about 15 minutes to get a beer and an hour more to get our meal.
It was well after 4 pm by the time we left town. And while Pinedale is the closest town to the trailhead, that is not to say the trailhead is close to town. The hike starts at the Big Sandy Trailhead, a mere 54 miles (half over dirt roads) from Pinedale. Despite its remoteness and the fact it was a Monday evening, there must have been a hundred cars at the trailhead, many lining the road for a half mile before the parking lot. Tanya says I have parking karma, so I drove right up to the trailhead itself and parked in the open spot there. We loaded our bear cans and repacked our backpacks to make them fit, and off we went, hitting the trail at the early time of 6:30 pm, entering the Bridger Wilderness shortly thereafter.

Dads Lake
Based on the blog cited above, we decided to hike the loop in a clockwise direction (I highly recommend hiking this direction due to the elevation gain), first traversing a section of the Continental Divide National Scenic Trail (CDT). Needless to say, we didn’t go that far that first day. We hiked several miles until near sunset, aiming to camp at Divide Lake, which is about 1/4 mile off the trail. We weren’t the only ones camping there. A couple who had left the trailhead perhaps 15 minutes before us was there, and later, perhaps 10:30 pm of or so, we saw headlamps from another group wander into the meadow below the lake and set up camp. It was a pretty spot, though we couldn’t camp directly near the lake because of marshy conditions (besides, camping within 200 feet of lakes is prohibited). We made dinner in the dark and slowly ate, amazed by the brightness of the stars and Milky Way.
The following morning we hiked back to the trail and continued north, passing lake after lake – Mirror Lake, Dads Lake, Marms Lake, as well as several smaller unnamed ponds. Just past Marms Lake, we left the CDT and headed off on the Hailey Pass Trail for a mile or so before turning east on the Shadow Lake Trail. The scenery was grand along the trails, which run mostly through meadows and give views of granitic mountains to the north and east. Along the trail we met several other groups of hikers going our same way. This is not a trip to take if you don’t want to see anyone else for days. While the route was not lonely, but neither was it overwhelmed with people.

Marms Lake
We reached Shadow Lake late in afternoon. The maintained trail ends at Shadow Lake, but an unofficial trail continues on above the to more lakes and on to Texas Pass. Earlier in the day we talked with several knowledgeable hikers who suggested the camping was better at Billy’s Lake, the next lake (about half a mile) past Shadow, and upon reaching Shadow Lake, we considered continuing. But being tired (living at sea level and hiking at over 9,000 feet in elevation will do that to a person), we decided to camp at Shadow. Besides the view of the lake, and the backside of the Cirque of Towers above it, was spectacular. With a bit of scouting and boulder hopping, we crossed over the outlet creek and camped on the west side of the lake. We had this side of the lake to ourselves (three or four other groups were camping on the east side). For photography purposes, I suggest camping where we did, as I think the view of the lake and mountains is better from the northwest shore of the lake.
I shot a ton of images that evening, as the sun lit the mountains above the lake with orange alpenglow – though fish jumping played havoc with the mirror-like reflections in the water. And when the alpenglow faded, I walked a couple hundred feet on the other side of our camp, where Washakie Creek (the outlet creek from Shadow Lake) widens into a large pond studded with granite boulders and shot some more. I finished the day with some Milky Way shots as it rose over the mountain west of the lake.
At sunrise, I was at it again, though the way geography is situated, sunrise photography is not nearly as good as sunset shots. Later that morning, we packed up and started up the trail to Texas Pass to hike into the Cirque of Towers itself. More on that in my next post.

Hailey Pass Trail north of Marms Lake

Heading toward the Cirque on the Shadow Lake Trail

Shadow Lake at the outlet creek

Shadow Lake near sunset

Another near sunset shot of Shadow Lake

Sunset over the pond portion of Washakie Creek

Milky Way over Shadow Lake

Morning light on the pond area of Washakie Creek

Morning light reflections on the shoreline of Shadow Lake
North Olympic Wilderness Coast – a Guide (Part 1)

 As I mentioned a recent post, last month I went backpacking in Olympic National Park along the coast with my brother Rob and his grandson, Izzy. Olympic National Park protects approximately 73 miles of Pacific Ocean coastline. The southern third of the beach is along US Highway 101. This beach extends from Ruby Beach in the north to Kalaloch in the south and is definitely worth a visit. But if you want a true wilderness beach experience, you need to visit the beaches north of Ruby Beach. The wilderness section of beach in the park is generally broken into two parts – known as the north and south Olympic wilderness coasts. The dividing line between the north and south sections is the Quillayute River and the town of La Push (which is at river’s mouth along the southern shore). Our trip was along the north coast, a total distance of about 32.5 miles.
Trailheads: there are three trailheads which access the northern Olympic coast. In the south is Rialto Beach, which is accessed by a road from the town of Forks (the town the Twilight series is based on). Near the middle of the northern coastal section, there is a trailhead at Lake Ozette (which has a campground and ranger station). Two trials to the beach leave Lake Ozette – one travels westward 3.1 miles to Cape Alava, and the other traverses 2.8 miles southwest to Sand Point. The distance between Cape Alava and Sand Point on the beach is about 3.1 miles, making a nice 9 mile loop hike out to and along the beach. The third trailhead, at the northern end of the coastal route, is on the Makah Indian Reservation and leads to Shi Shi Beach via a 2.2-mile long trail. The trail enters Olympic National Park shortly before reaching Shi Shi Beach.
We started our hike at the Shi Shi Beach trailhead and ended at Rialto Beach, traveling the entire 32.5 miles. Obviously other options are available for shorter trips – Shi Shi to Lake Ozette (via the Cape Alava trail) is 15.1 miles and Rialto to Lake Ozette (via the Sand Point trail) is 18 miles.

Here is the typical “trail” south of Shi Shi Beach and north of Seafield Creek.
We decided to hike in a southerly direction for the simple reason that Tanya was picking us at the end, and by ending at Rialto, she could wait on the beach rather than in a muddy trailhead parking lot several miles from the beach. The trip can be traveled in either direction. However, the southern portion of the trip is easier than the northern part, so if you want to get the hardest part out of the way first, traveling south is the way to go. From a photographic point of view, it doesn’t make much difference, though if forced to pick, I’d say traveling north is better so the sun is at your back more often.
The “Trail”: for most of the hike, there is no trail. Instead, you walk along the beach. Sounds easy, right? Well, if the beach is a nice, fine sand beach, and you are hiking at anytime other than the highest tide, it is easy. But not all the beaches are nice, fine sand beaches. Some are made of coarse sand or gravel. These are still fairly easy to hike on, as long as you realize that for every step forward, you may slide backwards half a step. And some beaches are made of cobbles and small boulders, again not too bad to hike on if you are careful and the rocks are covered with seaweed, which they often are. I think of these small boulder beaches as the ankle twisting beaches.
But not all the “trail” is on beaches. Much of it is through large boulders along the shoreline. These boulder areas are typically at or near headlands. Headlands, of course, stick out into the ocean. There are at least 19 headlands along the route. Many of the headlands can be walked around at low tide, two are impassable on the water side and must be traversed over their tops. For many, you have the choice of walking around, or going over. We usually went around them if we had a choice, but going around was not necessarily easy. Between the boulders, large tide pools, slick seaweed, and incoming tide, going around headlands is often a slow and tiring process. We could easily travel 3 miles per hour along the nice sandy beaches, but going around some of the headlands, we were lucky to make 1 mile in an hour.

Rob and Izzy coming down one of the trails over a headland – ropes required!
For the two headlands impassable at any tide, and the many others that can be crossed by going over their tops, there are “trails.” I put trails in quotes because they are not what I consider a normal trail. They are straight up and down, often with few hand and foot holds. They would be impassable, especially when wearing a heavy backpack, except for the aid of strategically placed ropes which allow hikers to pull themselves up and down. We knew there were ropes. What we didn’t know is that the ropes are typically rough braided and weathered synthetics. They are very rough on the hands. I suggest bring a pair of leather gloves. (Rob was lucky, he found a pair of leather gloves on the second day of our trip.) Most of these trails are 0.1 to 0.2 miles in length; however, south of Shi Shi Beach, there are two rails of 0.4 and 0.7 miles.
Camping: the Park Service maintains a number of wilderness campgrounds along the coast. All require use of a bear canister to to store food (bear canisters can be borrowed free of charge from the Olympic National Park Wilderness Information Center, or the WIC, in Port Angeles). Not that there are a lot of bears on the coast (there may be a few), but racoons expert in separating hikers from their food are plentiful. All campgrounds are located near a source of fresh water, which is surprising scarce on the coast (particularly this summer with the drought the Pacific Northwest is having). Most have a backcountry toilet available. Permits are required at all campsites, and reservations are required at the campgrounds within a day’s hike of Lake Ozette (from north to south, Seafield Creek, North Ozette River, South Ozette River, Cape Alava, Wedding Rocks, Sand Point, South Sand Point, and Yellow Banks). Outside the reservation camps, backpackers can camp outside the official campgrounds.

One clue to finding fresh water is look for the sea gulls, who tend to gather where creeks come across the beach.
Permits: as mentioned above, permits are required to camp overnight on the wilderness coast in Olympic National Park. Permits are available from the WIC. If camping in the reservation area, you may wish to request your permit at least several weeks prior to your trip. Permits cost $5 per person per night. The Makah Indian Reservation also requires recreational permits for use of trails and beachs on the reservation. So technically, if using the Shi Shi trailhead, you probably need a permit. However, the permits are to be displayed in your car while parking at the trailhead. However, overnight parking is not allowed at the Shi Shi trailhead. Instead, you need to park in a pay lot about half a mile from the trailhead (charge of $10 per night). We only had our car at the trailhead long enough to drop off our gear. Makah permits are available at several locations in the town of Neah Bay (which you drive through to get to the Shi Shi trailhead).
Tides: though 10-mile days may not be a problem on many backpacking trips, going 10 miles or more a day on the coast is difficult. We spent five nights traveling our 32 miles. Doing it in four days would have been possible; three days would be difficult. The reason – those headlands I spoke of earlier. You need to schedule your hike based on tides. The last thing you want to do is get halfway around a headland and get stuck by the tide – depending your location, that could be life threatening. You absolutely need to carry a tide chart with you. I also recommend the custom coast maps available from Discover Your Northwest. These maps (0ne for the north coast, and one for the south) show the tide levels at which headlands can be rounded. Depending on how many headlands you may need to round in a day and the tides that day, you may only be able to hike in the morning or evening. Further, you may be stuck by the tide for four or five hours – as we were twice during our trip.

There is a lot of trash on the beaches, including numerous buoys. Often these are collected at the campsites, such as here at south Shi Shi Beach.
The Route, Shi Shi to South Sand Point: as mentioned above, we started at Shi Shi Beach. This beach if very popular, and on summer weekends, it can be crowded. We started on a Monday, and it was not a problem. Shi Shi is a very beautiful beach and is easy to hike on. The trail to Shi Shi is muddy, even in the drought we are currently experiencing. There are many great places to camp on Shi Shi, with three official campgrounds – one on the northern end where the trail comes out, one in the center where a creeks exits the hills to the beach, and one at the southern end at a small creek. We camped at the southern end. This was great location, very close to the Point of Arches, making for great photography. There are also lots of nice tide pools at the Point of Arches.
South of Shi Shi, getting around the Point of Arches requires a tide of 4.5 feet or lower, though there is also an overland trail. The next several miles, by a series of headlands, are the most difficult of the entire hike. There are several long overland trails in this area, but there are also several place that require low tides to get around (depending on the headland, tides of 4 to 6 feet or lower are required). We were stranded for four hours in this area. Though difficult, the scenery is spectacular.
South of this series of headlands, there is a long section of beach without headlands, though most of is not sandy. This section, which goes by the Seafield Creek camp and stretches to the North Ozette River camp, is easy enough to hike at low to medium tides. However, it could be difficult at high tide, when the water can reach up the beach into the driftwood (which is typically large to very large logs – not easy to walk through). We camped at North Ozette, which has a nice site above the driftwood and several more in the trees. (Unfortunately, when we were there, we did not get one of the nicer sites as another party was taking up four campsites. They did give up one for us, but were using perhaps the best spot as their kitchen area.)
The two campgrounds at the Ozette River are separated, wait for it, by the Ozette River. There is no bridge across the river. You will get wet crossing the river. How wet depends on the tide. At low tides, it may be ankle-deep. At high tide, forget it. We crossed at a tide of about 1 foot, taking off our boots and socks, and the water was a bit more than ankle-deep. It is probably passable at tides up to about 3 or 4 feet without a problem.
If you camp at the Ozette River, you will need to go as far upstream as possible to collect fresh water. At high tide, salt water backs up into the river, making the water at and near the mouth of the river very saline.
South of the river, there are a couple small headlands needing 4 and 5 foot tides or lower to pass (no overland trails available) followed by rocky beaches to Cape Alava. Cape Alava is the site of a pre-historic Indian village. In this area, where the trail from Lake Ozette comes in, you will start seeing a lot more people as you encounter day hikers.
About one mile south of Cape Alava is Wedding Rocks. This is worth a definite stop as there are petroglyphs present on many of the rocks. The best petroglyphs (orca whales and people’s faces) are at the southern end, near the start of another rocky beach (and near the southern end of the overland trail around the Wedding Rocks).
Past Wedding Rocks the beach is rocky, but not too difficult for a mile or so, then becomes sandy near Sand Point (where the other trail from Lake Ozette comes in). The campground at Sound Point is quite large. We instead camped at South Sand Point, a further 0.6 miles down the beach. The hiking near Sand Point is probably the easiest on the whole route, being along a broad sandy beach.
In my next post, I’ll go over the rest of the route. All the photos shown here are from this northern half.

The coast is often fogged in. When we first reached Shi Shi, this is the scene that greeted us. Luckily, it was the worst weather of the entire trip.

By the time we set up camp at south Shi Shi, the weather was improving.

This is near the Point of Arches, the first evening of our hike

By using a neutral density filter, you can eliminate the waves. This at the Point of Arches (30 second exposure).

Near sunset at Point of Arches and south Shi Shi Beach

Being on the west coast, the sunsets are great. This one at Shi Shi with part of the Point of Arches.

Scene crossing the headlands south of Shi Shi Beach

There are lots of tidepools to photograph. Unfortunately, the normally plentiful starfish were largely absent due to a starfish virus killing them off this year.

When stuck by the tide for 4 hours, what do you do? Build a fort out of driftwood, as Rob and Izzy did!

Sunset at the Ozette River

Petroglyphs at Wedding Rocks

Near Sand Point, the beach is broad and sandy; not quite so scenic as with all the headlands to the north. But it is good for close ups of driftwood.
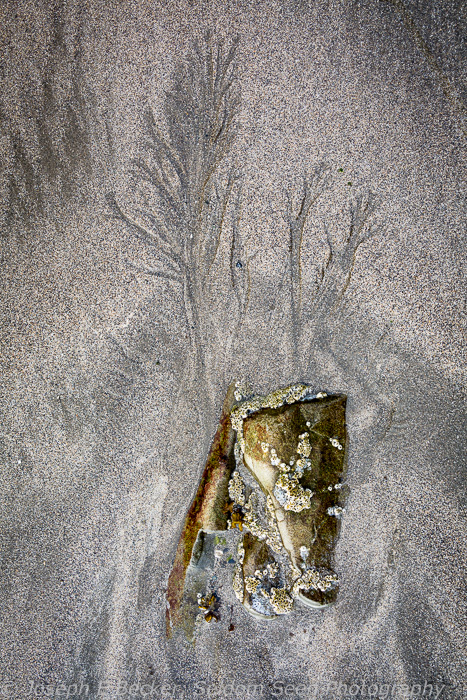
And also patterns in the sand.
Seven Lakes Basin/High Divide – a Photo Guide
 The 7 Lakes Basin/High Divide hike is one of the premier backpacking trips in the Olympics if not in Washington State. The scenery is superb and varied. It includes one of the best waterfalls in the state, old growth forest, multiple lakes in both sub-alpine and alpine settings (don’t let the name 7 Lakes Basin confuse you, there are many more than 7 lakes), and views north to Vancouver Island, west to the Pacific, and a fantastic view south to the Hoh River and Mount Olympus.
Wildlife is also abundant. Sightings of deer, elk, mountain goats, and black bears are very common (however, on my recent trip, of the four species, we only saw deer; although based on other hikers’ and backcountry rangers’ comments, we were in the minority). In particular, the mountain goats are so common in frequenting trail and campsite areas, that (at least when I was there) rangers direct hikers to throw rock at them to get them to move off the trail (apparently, the goats are starting to believe they are the dominate species and think humans should move off the trail for them rather than the other way around; the rangers are trying to teach them the opposite).

Sol Duc Falls
While the loop is just over 18 miles in length, several of the campsite are not directly on the loop, so the actual length for most people is 19 miles or more. Most people complete the loop in 3 days. We decided to take it slow, and spent 4 nights in the basin. There are four “large” backcountry campgrounds with 6 to 16 campsites: Deer Lake, Lunch Lake, Heart Lake and Sol Duc Park. There are at least 14 other campgrounds with just a single site. Camping is only allowed at the designated sites, and a permit is required. 50% of the campsites can be reserved in advance, and the most popular fill up fast (particularly Heart Lake). This trail is very popular. If you are seeking solitude while camping, avoid the major campground and reserve some of the single sites. For example, we spent one night at Round Lake which was quite private even though it is close to Lunch Lake.
From a photography prospective, unless you want forest shots, the best views are high up in the basin – so you may want to concentrate camping at Heart Lake, Lunch Lake, and Round Lake. For sunrise or sunset views of Olympic Range (and Mount Olympus in particular) without a long hike from your campsite, options are limited. Mount Olympus is only seen from the portion of the trail which actually traverses the High Divide ridge. Other than the Heart Lake Junction campsite (which I didn’t specifically visit, but from the main trail, it appeared to be a dry camp) and a campsite in Cat Basin (which is off the main trail by at least a mile), the High Divide part of the trail is about a 1/2 mile hike and several hundred feet elevation gain from Heart Lake and several miles from Lunch Lake. Without camping at Heart Lake, Heart Lake Junction, or Cat Basin, it is likely you may only see Mount Olympus in mid-day. Inspiring yes, but not the best light as Olympus is directly south of High Divide.
Another consideration about where to camp is what direction you do the loop in. Most people do the hike counterclockwise, spending the first night at Deer Lake (about 3 1/2 miles from the trailhead) or Lunch Lake (about 8 miles). The advantage of going this way is that the elevation gain is a bit more spread out. However it is also possible to go clockwise, which has little elevation gain for the first 6 miles or so (in the Sol Duc River valley), then climbs steeply over 2,000 feet in about 2 miles through Sol Duc Park to Heart Lake. I’ll discuss the photo worthy highlights from a counterclockwise perspective, since that is the direction we did the trip.
The trailhead (elevation about 1,870 feet) is just down the road from Sol Duc Hot Springs resort and campground. Sol Duc Falls (elevation 1,927 feet) is 0.8 easy miles from the trailhead. These falls are one of the most photogenic waterfalls in the Olympics and perhaps even Washington State. The falls consist of three side-by-side drops of approximately 35 feet where the Sol Duc River drops sideways into a narrow gorge. There are several viewpoints from which to photograph the falls, the two main ones being a footbridge a short distance north of the falls and a viewing area directly south of the falls. Set in a beautiful old-growth forest, the scene from both viewpoints is spectacular. However, being in the forest, contrast can be a big problem photographically. Sunlight shining on the falls creates extreme contrast differences. Photographing the falls on a cloudy day or early or late in the day when the falls are in shadows are preferred times.

Creek near Round Lake
These preferred times may also help with the second problem photographing the falls. They are extremely popular, and it is hard (at least in summer) to find the falls without people climbing on the rocks above the falls. Luckily, if you take the loop hike, you go by the falls twice, giving you two opportunities to find good light and few people. On our hike, on our first visit, there were perhaps 50 people there, including several women in bright clothes performing some sort of yoga(?) exercise on the rocks at the top of the falls. Further, it was mid-afternoon, and with part of the falls sunlit, the contrast was bad. Our stop at the end of the hike was in late morning. And though there were still a lot of people present, they were mostly out of the frame when shooting the falls. And although sunlight was still an issue, it was more controllable with post-processing.
From Sol Duc Falls, the trail rapidly gains elevation as it makes it way along Canyon Creek to Deer Lake, 3.4 miles from the trailhead (elevation 3,527 feet). This portion of the trail is in forest, but there is a nice view of the creek where the trail crosses on a well constructed bridge. The first view of Deer Lake is where the trail crosses the outlet stream, a good place to photograph the lake (depending on light conditions of course). The lake is set in a sub-alpine forest with occasional meadows, making for some nice views (see this image from my previous post), though certainly unspectacular compared to the higher lakes further up in the basin. The lake is aptly named, we had a buck wander through our campsite in the evening and saw several does in the morning.
Past Deer Lake, the trail resumes its climb toward High Divide, coming out of the forest into a mixed forest and meadow area at the Potholes (4.9 miles, 4,115 feet elevation). The Potholes consist of several ponds and small lakes and a small (one or two sites) campground. This may be worthy of a quick stop or at least a few shots taken from the trail. At the time of our visit (and likely through much of August), wildflowers were abundant from this point on the loop all the way to Sol Duc Park.
Beyond the Potholes, the trail grade moderates somewhat as it eventually reaches the divide that separates the Sol Duc drainage from the Bogachiel drainage (6.1 miles, 4,750 feet). Eventually the trail settles on the Bogachiel side, traversing a very steep hillside along fairly level path below the top of the ridge. The trail eventually reaches a side trail junction that drops down into the 7 Lakes Basin, and specifically to Lunch and Round Lakes (7.05 miles, 4,862 feet).
The 7 Lakes Basin is named for seven lakes within the basin: Round, Lunch, Sol Duc, Clear, Long, No Name, and Morgenroth Lakes. However, the basin name is a misnomer. There are many other lakes in the basin including Lake Number Eight and the Wye Lakes (see below).
Most hikers, us included, hike down to Lunch Lake, dropping about 500 feet in less than half a mile. The views of Lunch and Round Lake are spectacular along this side trail. We spent one night at Round Lake and a second night at Lunch Lake. There are many photo opportunities in the area immediately around the two lakes. You can also venture further out in the basin. From the east end of Lunch Lake, there are trails to Clear Lake and into the Wye Lakes area.
We day hiked into the Wye Lakes area and were pleasantly surprised by the many small lakes we found. These lakes are not shown on some maps (including the Green Trails map we were using). The Wye Lakes are located in a treeless bowl below Bogachiel Peak (see the post-opening photo above). We counted at least 10 lakes in the area, though some would more rightly be classified as ponds. From the southern end of the Wye Lakes area, it looked like you could fairly easily bushwhack down to No Name and Morgenroth Lakes.

One of the Wye Lakes
During our two nights in 7 Lakes Basin, we saw plenty of deer, including several fawns, but no other wildlife other than frogs (lots of frogs), salamanders and fish. The volunteer ranger at Lunch Lake said the mountain goats loved to hang out in and near the Lunch Lake campground, but they were absent when we were there. (She later told us that while we were camping at Lunch Lake, the goats had traveled to Heart Lake and were staying at the campground there. However, the next day when we hiked to Heart Lake, the goats had left).
To continue from the Lunch Lake area, you have a choice: you can hike back up to the main trail or take a short cut through the Wye Lakes area. Back on the main trail, the way continues traversing the side of Bogachiel Peak, working around the west and south sides of the peak, nearly reaching the summit at 8.12 miles (5,377 feet elevation, the high point on the trail) from the trailhead. Along this part of the trail, shortly before reaching the high point, there is a side trail down to Hoh Lake, a steep 800 feet below the ridge southwest of Bogachiel. From the high point on the trail, it is an easy walk, but airy on the north side, up to the top of Bogachiel Peak. From the high point, the main trail continues atop the High Divide Ridge line eastward with fantastic views of Mount Olympus, the Baily Range, and the Hoh River valley to the south and the 7 Lakes Basin to the north. If you take the short cut through the Wye Lakes area, you reach High Divide at about the 8.8 mile point at just under 5,000 feet elevation. (This short cut saves, by my calculations, about 400 feet elevation gain and about 0.75 miles). We took this route, dropping our packs and hiking back up the main trail to the top of Bogachiel Peak.

Mount Olympus from High Divide
The trail continues along the top of High Divide until finally turning northeast to drop to Heart Lake at 9.95 miles from the trailhead (5,042 feet). The two miles of trail from the Hoh Lake junction to the Heart Lake junction are incredible for their view of Mount Olympus. Unfortunately, as mentioned previously, you will likely be hiking this portion in mid-day, and with Olympus due south, the light for photography is not prime. From shortly before the Heart Lake junction all th the way back to the trailhead, it is all downhill.
Heart Lake (10.3 miles, 4,744 feet) is a small, pretty lake and is definitely worth a stop for photos if not camping there. Below Heart Lake, the trail descends rapidly, gradually entering the forest and leaving the alpine lands behind. This part of the trail is known for being frequented by elk (though we did not see any). The trail reaches Sol Duc Park at 11.1 miles (4,135 feet), a nice sub alpine forested campground. The trail continues dropping, never far from but with only occasional views of the Sol Duc River. The forest eventually morphs from sub alpine to low land old growth with seemingly impossibly tall fir and hemlock trees. We spent our last night at the Appleton Junction campsite (13.35 miles, 3,082 feet, next to the Appleton Pass trail intersection with the High Divide trail). This camp is near by the very scenic Rocky Creek (there is another campsite right on the creek), full of mossy logs and rock amid rushing white water. The final five miles of trail are gradually downhill through old growth forest, eventually once again reaching Sol Duc Falls at about 17.3 miles and the trailhead at 18.1 miles.

Rocky Creek
All in all, this is a great photography trip and is one of the highlights of Olympic National Park. (Note: I borrowed mileage and elevation data from the High Divide trail description on the Pro Trails website.)

Beargrass near Lunch Lake

Lunch Lake Evening

Another of the Wye Lakes

Heart Lake

Lunch Lake and Bogachiel Peak

Old growth forest near the Sol Duc River
Seven Lakes Basin Preview
I spent most of last week on a backpacking trip in Olympic National Park, making the 19-mile loop trip around the 7 Lakes Basin and along High Divide. Together with my two partners (my brother Rob and his grandson Izzy), we spent 5 days on the trip. In the next few days, I hope to write a photo guide post for the 7 Lakes Basin, but until then, here are a few images from early in the trip to give you an idea about what the 7 Lakes Basin is all about.

Beargrass and Round Lake

Meadow near Deer Lake

Lunch Lake

Fawn playing at our campsite at Round Lake

My hiking buddies resting on the trail to Deer Lake


