Mossy Cave

 One quick, last post about my recent trip to Utah. On our last morning there, before driving back up to Salt Lake City and the airport, we took the short hike in Bryce Canyon National Park to Mossy Cave. This short trail travels along a stream up to a mossy grotto that weeps groundwater. It is a pleasant and beautiful little hike that let you experience Bryce Canyon without the huge crowds or paying an entry fee. The grotto (ie the “cave”) is interesting from a geologic perspective, but difficult (at least for me) to photograph. More photogenic are scenes along the stream, looking up into the surrounding hoodoos and formations, and a small waterfall on the stream.
The trail starts from a small parking area along Highway 12 between the town of Tropic and the turnoff to the main entrance to Bryce Canyon National Park. The day before we took the Mossy Cave hike, we took a hike in the main part of the park. Needless to say, we were not lonely on the trail. There may have been one 30 second span where we did not see any other hikers, but most time, it was not different in the number of people than walking down the sidewalk in downtown Seattle. The Mossy Cave trail was different, only a few other people, well at least until near the end of our hike when a tour bus pulled up and spit out a crowd.
If you have an extra hour when visiting Bryce Canyon, I highly recommend the Mossy Cave hike.

The stream along the Mossy Cave Trail

Small windows in the formations above the trail.

The small waterfall near the end of the Mossy Creek Trail

I couldn’t post about Bryce Canyon without at least one shot of the “main event.” This was taken shortly before sunrise from near Inspiration Point. Sunrise at Bryce Canyon National Park is an experienced not to be missed. Just do not expect to be the only one there. I shared this view with hundreds of other people.
Hiking in the GSENM

 On our recent trip to Utah, Tanya and I (with our friends Jim and Kris) spent two days in the Escalante area in the heart of the Grand Staircase Escalante National Monument. I first took Tanya here about 15 years ago, when the Grand Staircase Escalante National Monument was still relatively new and unknown to many. Not so much today, though it still gets a fraction of the visitors the Utah national parks get. We did three and a half hikes in the national monument, and while we weren’t the only people on the hikes, they were not like the hike we took in Bryce Canyon National Park a few days later where there were many hundreds of people on the trail. On each of the hikes we took in GSENM, there were long periods of time were we didn’t see other people. And on the half hike (can’t call it a full hike, it was only 1/2 mile round trip) we were the only ones there.

Tanya in Peek-a-Boo under a natural bridge in the slot canyon.
Still, it isn’t like it was 15 years ago. One hike we took, both last month and 15 years ago, was to Peek-a-Boo and Spooky slot canyons. The first time we did this hike, I think Tanya and I saw one other group of people and there were maybe two other cars at the trailhead. Last month, there were probably 20 cars at the trailhead, and other 20 that were parked down the road from the trailhead (that couldn’t make it all the way in due to not having high enough clearance). We saw plenty of people, from 4-year old kids to 70-year old grandmothers. However, there were few enough people that I didn’t have a problem setting up and using my tripod while in the slots. This trip, we also hiked down to Brimstone slot canyon (we didn’t do this 15 years ago); on that part of the hike, we only saw two other groups of people – so it is fairly easy to still find solitude in the GSENM.
The Peek-a-Boo/Spooky hike is, perhaps, the most popular hike in the GSENM, and rightly so. There are few other areas with such easy access to pretty and non-technical slot canyons. The two slots, as well as Brimstone, are tributaries to the Dry Fork of the Coyote, which itself has some nice narrows. The trailhead is on the rim of the Dry Fork canyon, and the trail down to the canyon bottom is a mile or less. Peek-a-Boo is almost directly across the canyon bottom from where the trail from the carpark ends. The two canyons make a nice loop, climbing up Peek-a-Boo and back down Spooky. Peek-a-Boo requires a short climb to get into, but from there on it is fairly easy to navigate, with only one spot where you need to crawl a short distance. Spooky is much narrower in many spots, and there is one set of large boulder-sized chockstones that requires climbing down through a hole in the boulders, back up canyon under a boulder, down through a very skinny hole, and then down canyon again under the remaining boulders. Down canyon from that spot there are no more obstacles, just plenty of super-tight sections where both your chest and back rub against the walls at the same time. Peek-a-Boo is not as deep as Spooky, and when we were there at mid-day, direct sunlight into the slot made photography difficult due to contrast issues. Spooky, being deeper and narrower, made for better photography, but it was much darker and a tripod was definitely needed.
Brimstone Canyon is about an hour’s walk down the Dry Fork from Spooky. This side canyon starts large and narrows and narrows until was impossible, for me anyways, to go further. It is very deep and extremely dark, but well worth the extra hike.
The day prior to our slot canyon adventure we hike to Upper Calf Creek Falls. Though the turnoff from the highway is unmarked, we still found 10+ cars at the trailhead. This relatively short trail goes downhill over slickrock and sand into the Calf Creek canyon to a lovely small waterfall. We chose this hike over the more popular Lower Calf Creek Falls because Tanya and I had not hiked it before. Lower Calf Creek Falls is larger and more spectacular, but you will find the trail more crowded as well. After our hike to Upper Calf Creek Falls, we stopped at the Calf Creek Campground – which is also the starting point of the trail to Lower Calf Creek Falls – for lunch and the parking lot was overflowing with cars of hikers to the lower falls.

Jim checking out Upper Calf Creek Falls
Our third hike was down and back up through the Willis Creek Narrows (the featured photo above is from there). There are several points where Willis Creek canyon slots up. At it narrowest, the slot is perhaps only three feet wide, so it is not quite the claustrophobic adventure of Peek-a-Boo, Spooky, and Brimstone. But it has a small stream running through it, and we found it a easy, beautiful, and very relaxing hike. It is possible to do the hike without walking in the creek, at least at the water level present when we went, but I hiked in my sandals and just walked in the water.
The Grand Staircase Escalante National Monument offers many other hikes and slot canyons to explore. I’ve been to the area a half a dozen times, and each time I come away wanting to go back soon. If you haven’t been to this area of Utah, I highly recommend it. This national monument is on the list being examined by the Trump administration for possible elimination; it would be a crime if the protection the area is afforded by its national monument status is taken away.

Looking up through some natural bridges in Peek-a-Boo
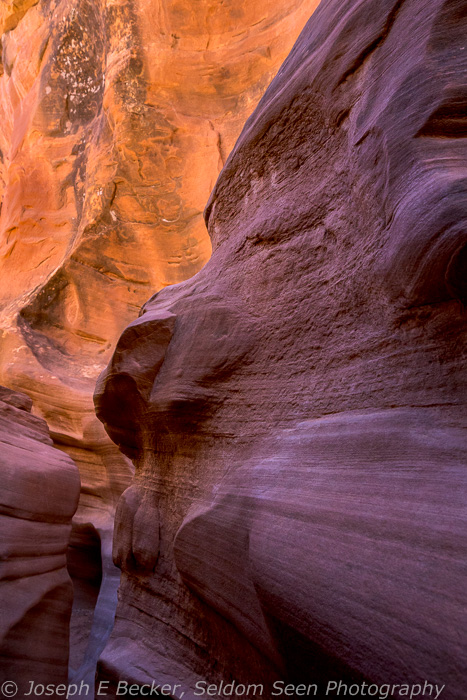
Where there is not direct sunlight, there is some good photography in Peek-a-Boo

There is less direct sun in Spooking, making shots like this and the next two easier as long as you have a tripod!

More of the Spooky slot

One last shot of Spooky

While Spooky is dark, Brimstone, being deep and narrow with lots of desert varnish, is almost black – this a 30-second exposure in mid day

Here’s another shot in Brimstone

Along the slickrock portion of the Upper Calf Creek Falls trail – loved these basalt boulders laying on the slickrock

More boulders, with stormy skies approaching – luckily not slot canyons for us that day!

Yucca in bloom along the Upper Calf Creek Falls trail

A portion of the Hundred Hands pictograph panel. There are also several nice petroglyphs near this site that unfortunately have been vandalized. The site is about 1/4 mile from the highway crosses the Escalante River.

The prickly pear cactus was blooming on all the trails! This near the Hundred Hands panel.

Kris hiking in the Willis Creek Narrows.

Scene in the Willis Creek Narrows

More of the Willis Creek Narrows

This section is near the end of the narrows. My guide book suggested the first part of the Willis Creek Narrows were the best, but I liked this section more.
Cathedral Valley

 In the half a dozen trips I’ve previously made to Capital Reef National Park, I was enthralled by descriptions of Cathedral Valley and knew I had to go there. However, until last month, I had never made it. Cathedral Valley is in the northern portion of the park. Park. There is a loop road through the valley, traversing both Park and BLM land. A high clearance vehicle is a must, 4-wheel drive is optional, but nice to have. The road is impassable if wet. In my previous trips to the park, I either had a car without the required clearance, or the weather didn’t cooperate. During my trip last month, I was determined to make it into the valley.
At first, it seemed like fate would prevent me from seeing Cathedral Valley once again, thanks our rental-car company. Tanya and I flew into Salt Lake and met up with our friends, Jim and Kris, who had flown in earlier that day. I had reserved a Jeep Grand Cherokee with Fox Rent-a-Car, picking that vehicle specifically for its high ground clearance. We got the Fox counter about half an hour after the plane landed, and there were two parties in line ahead of me. They gave the person two ahead of me a Grand Cherokee. When I got up to the agent, they said they didn’t have any Grand Cherokee’s left (having just given the last one away). Instead, they offered a Dodge Journey, which they claim was the same class of car (it is not, the Journey is a crossover, not an SUV). I was not happy. Tanya went through their parking lot looking at which cars had the highest ground clearance. We ended up with a Jeep Patriot, which had more ground clearance than the Journey, but not as much as a Grand Cherokee, nor is it as large. With 4 people and luggage, it was a bit of tight fit. But luckily, as I found out, the Patriot worked well on the Cathedral Valley road (later in the trip, but not in Cathedral Valley, we could have used the extra ground clearance, as we bottomed out a couple times).

Abandoned drilling rig in Blue Flats, the Henry Mountains in the background.
After securing the car, we drove down to Teasdale, Utah, where we had an Airbnb booked for that night. Teasdale is immediately west of the town of Torrey and about 12 miles from Capital Reef. The next morning the sun was bright and the forecast was for clear skies and no rain – perfect for a Cathedral Valley drive. We drove into the park and stopped at the visitor center. It was a zoo, loaded with tourists from across the globe. But we would leave 99% of them behind by driving to Cathedral Valley. We purchased the road guide ($2.95 and well worth it) and set off. The road guide describes 41 historic, geologic, and/or scenic stops along the 96 mile (from the visitor center back to the visitor center) trip. The Cathedral Valley loop road itself starts at mile 11.7, and the first “stop” is the Fremont River ford at mile 12.2. The river was running at about 12 inches depth that day (according to the ranger at the visitor center), and we had little difficulty driving across the river even though I missed the shallowest part.
From there the road traverses up some hills into a broad valley called Blue Flats. In the middle of the valley is an old, abandoned well drilling rig (next to the last well it apparently drilled; the artesian well providing a flow of several gallons per minute). Jim and I found this most fascinating, as we are both groundwater geologists and often work with drill rigs in our day jobs. From there the road climbs out of the valley through the Bentonite Hills. Bentonite is a form of clay, and here for sure, the road would be impossibly slick to drive if wet. Bentonite also forms lovely rounded, colorful hills and badlands, and it was a delight to the eye to drive through this part of the road.

Here is the road as it climbs through the Bentonite Hills.
From there, the road continues climbing and eventually enters the national park, where there are several viewpoints of the lower South Desert, a scenic valley to the southwest of the road. The road continues to an overlook of upper Cathedral Valley, with a great view of a series of monoliths in the valley below. The monoliths are reminiscent, and about the same size as, cathedrals – thus, I believe, the name of the valley. Near this viewpoint is a campground with six primitive sites.
The road then drops down into Cathedral Valley proper. There are a couple trails in this part of the valley, a short trail to a historic cabin and a 1.1-mile trail to provides up close views of the monoliths. Due to the time of day, and a pending dinner reservation at Cafe Diablo (great restaurant) in Torrey, we declined to take the trails and kept going. Here the loop road turns back to the east as it traverses the valley floor, magnificent valley walls all around. After passing some volcanic dikes – black vertical rocks that have cut through the older sedimentary rocks of the valley – there is a short side road to the Gypsum Sinkhole – an unusual, large, deep hole in the ground at the base of cliff where water dissolved away a gypsum dome.
The road leaves the national park, but another short side road takes you back in. This road takes you to Glass Mountain and the Temples of the Sun and Moon. Glass Mountain isn’t really a mountain, but a large mound of selenite crystals. Selenite is a form of gypsum, and the mound is similar to what was formerly at the Gypsum Sinkhole prior to the sinkhole forming. Nearby are the Temples of the Sun and Moon, two large and impressive monoliths in the middle of the valley floor. The road takes you to base of each. We saw several people camping just outside the park boundary on this road – a perfect spot to camp if you want to capture sunrise light on the two Temples. Not such a great spot if you want shade.

The Temple of the Sun and, in the distance, the Temple of the Moon
The main road continues through BLM land, offering more primitive camping spots with great scenery, including the dramatic Cainville Mesas. At mile 77.3, the road returns to the highway, about 18 miles east of the visitor center.
Cathedral Valley is a landscape photographer’s (and geologist’s) heaven. Photographically, the best way to capture it would be to camp along the loop, either in the small campground in upper Cathedral Valley or off the road in the BLM section, allowing you to be in the area during the golden hours. Even if you cannot camp along the loop, the road is well worth traveling (provided you have a high clearance vehicle and there is no rain in the forecast). Laurent Martries, in his book Photographing the Southwest, Volume 1 – a Guide to the Natural Landmarks of Southern Utah, proclaims Cathedral Valley as “one of the most remarkable spots on the planet.” I have to agree.

Jim and Kris checking out the view between the river ford and the Blue Flats

View into the South Desert valley

View from the Upper Cathedral Valley overlook

Volcanic dike rocks tower above the Baker Ranch Road, which intersects the loop road in Cathedral Valley

Tanya at the Gypsum Sinkhole. The hole is about 50 feet across and 200 feet deep. We spotted a crashed drone in the bottom of it.

Part of the southern valley wall of Cathedral Valley near the sinkhole

More bentonite hills, as the loop road heads eastward on our way back out to the highway

Part of the Cainville Mesas near were the road rejoins the highway
Nighttime Etiquette

 I recently returned from our quick trip to Utah. While there, I spent several hours in the middle of the night doing some Milky Way shots at Devils Garden in Grand Staircase – Escalante National Monument (a fantastic place that I love and that my so-called President is trying to take away). I arrived at the Devils Garden parking lot at about 1:30 am on a weekday morning. I obviously wasn’t the only one with the idea of shooting there that night, as the parking lot had five other cars parked (by comparison, I took Tanya and our friends Jim and Kris back there later in the morning – around 10 am – and there were only two other cars there).
Devils Garden is a fairly small area filled with wonderful hoodoos and several arches. And I was a bit surprised by the number of photographers there there, but figured if everyone was polite with their lights, we could all get along. I headed toward one particular set of four hoodoos shaped like heads from Easter Island that I thought would look great with the Milky Way and some light painting. However, there was a group of people already working there. So instead, I went to Metate Arch and shot the image above. I did my light painting with a LED headlamp covered with an orange gel. I was pretty happy with the result, and hoped the other folks had moved on to another spot so I could capture the “Easter Island” hoodoos. But no, they were still there.

Light pollution caused by other photographers. Red light in lower center and light painting and flashlight spot in lower left.
I talked briefly with another photographer, asking him if my light painting had hindered him, but he said no. He was not with the group by the Easter Island hoodoos also wished they would move. He had been photographing some hoodoos near Metate Arch, and we traded places. I had some trouble shooting this spot, the group down by the Easter Island hoodoos was in the corner of my composition and they rarely turned off their lights. Further the photographer now at Metate Arch was occasionally using his light, and that was partly in my shot as well. Between the two, I took five shots, none without some light from the other photographers – especially the group by the Easter Island hoodoos – whom it seemed when they finished with light painted, turned on red lights and keep them on until they started light painting again (for those who don’t know, when out doing night photography, using a red light helps keep your night vision). Rarely did they have both their normal and red lights off. The image shown here is the best of the lot I took – there is some red light from the photographer by Metate Arch (lower center) and the light on the Easter Island hoodoos (down in the lower left corner) isn’t too bad. I was able to use Photoshop to fix the image (see below), getting totally rid of the red light in the center, removing the light spot in the lower left, and dimming the rest of the light in the lower left (I thought it looked better with a little light there rather than making it totally dark). I am happy with the result, but by now I was starting to get a bit mad at the rudeness of the group down by the Easter Island hoodoos, who almost always had one light or another on.
I ended up photographing three other spots, two of which are shown below, in total spending about two hours at Devils Garden. I never did make it to the Easter Island hoodoos as the light-happy group of photographers there never left the spot. And frankly, even now, days later, I’m still a bit peeved at that selfish and rude group.
Aside: rant directed at that group of photographers: seriously people, would you sit in the front row of a movie theater and talk on your cell phone for the entire movie? Do you enjoy shining your flashlight in other people’s eyes at night? Do you never turn off you high beams when other cars approach on the highway? And it’s not just the lights. It’s hogging the spot. It’s one thing to arrive early and setup at a preferred spot for sunrise – sunrise only last 10 or 15 minutes. But honestly, 2 hours without moving at a place that has dozens of potential shots? Have you no creativity? Obviously not! How many shots of the same set of hoodoos do you need? I suppose you never learned to share your toys when you were a kid either.
With the capabilities of today’s digital cameras, night photography is continually growing in popularity, and you will often find other photographers out with you at the same time as many sites, such as Devils Garden. Such situations beg for politeness and etiquette. If you find yourself out with other photographers at night, please be respectful and use your light sparingly. In places such as Devils Garden, where there are multiple subjects, try not to hog one spot. Nighttime photography is much more difficult than daytime work, it is more difficult to control the camera, more difficult to focus the lens, more difficult to get a composition, and demands long shutter speeds. It is difficult enough that you shouldn’t have to also battle light pollution from other photographers.

Image above with light pollution removed in Photoshop


Heading South
 Later this month, Tanya and I will be off for a quick trip to Utah with friends. Nahla, unfortunately, gets to stay home with our housesitter. Rather than driving down like we usually do, due to only having a week for the trip, we will fly down to Salt Lake and rent a car. We plan on spending two days at Capital Reef National Park, before heading down to Escalante for two days, and finishing up with two days at Bryce Canyon National Park. This is a great time to go; it is usually sunny and warm, but not yet hot, with fewer thundershowers (than summer) ruining those slot canyon hikes. In anticipation of the trip, I’m posting a few shots from my past trips to the area. The one above is from the Grand Staircase – Escalante National Monument. The two below are from Capital Reef and Bryce Canyon. Looking forward to getting more shots like these.


